How to Update DNS Settings in Popular Providers
It is important to make the required changes to your DNS settings to ensure you get the best deliverability when using Transpond. There are 5 important DNS records you will need to add or edit:
- SPF and DKIM - To authenticate your Email Domain.
- Tracking domain - To help with custom link tracking.
- CDN domain - To host your images and media.
- DMARC - To help prevent spoofing and phishing.
Each DNS provider has slightly different steps in order to add or edit DNS records. Below is a list of some of the most popular DNS providers and the steps you need to use to set up DNS records with them.
Who can use this feature? All Staff
Available on: Free, Starter, Growth, Advanced and Ultimate
| 123-Reg | BlueHost | CloudFlare | DreamHost | GoDaddy |
| GreenGeeks | Heart Internet | Hostgator | Hosting.com | Hostinger |
| Hover | Ionos | InMotion | NameCheap | SiteGround |
📙 If you are looking for help on how to add and manage domains inside Transpond, you can read our article on Adding Your Domains.
123-Reg

What details do I need?
Below is a list of the types of records you need to create or edit.
| Type | HOSTNAME | TARGETNAME / Content |
| CNAME | mp1._domainkey | dkim.ourmailsender.com |
| TXT | @ | v=spf1 include:spf.ourmailsender.com ?all |
| CNAME | mptrack.yourdomain.com | api.transpond.io |
| CNAME | mpcdn.yourdomain.com | cdn1.ourmailsender.com |
| TXT | _dmarc | v=DMARC1; p=... |
Make sure to replace yourdomain.com with your own domain.
How to add and update your DNS records in 123-Reg
- Login to your 123-Reg account
- Select your domain from the drop down > click MANAGE

- Under Advanced Domain Settings, click MANAGE DNS

- On the ADVANCED DNS tab, choose Add New Record
-
Fill out the relevant details for the record you want to add:
- HOSTNAME: If you are using a subdomain enter it in the hostname field, otherwise leave it blank
- TYPE: Select the record type (CNAME, TXT, ANAME, etc)
- DESTINATION: Enter the value we have given you. For example the Tracking Domain name, the SPF record value, etc.

- Click the Add button to save your changes.
BlueHost

What details do I need?
Below is a list of the types of records you need to create or edit.
| Type | HOSTNAME | TARGETNAME / Content |
| CNAME | mp1._domainkey | dkim.ourmailsender.com |
| TXT | @ | v=spf1 include:spf.ourmailsender.com ?all |
| CNAME | mptrack.yourdomain.com | api.transpond.io |
| CNAME | mpcdn.yourdomain.com | cdn1.ourmailsender.com |
| TXT | _dmarc | v=DMARC1; p=... |
Make sure to replace yourdomain.com with your own domain.
How to add and update your DNS records in BlueHost
- Login to your BlueHost Control Panel
- Click the Domains tab from the left menu
- Find your domain the domains drop down, and click the down arrow
- Choose DNS from the drop down menu

- Scroll down to locate the record type you wish to update (A,TXT, CNAME etc), and click the Add Record button

-
Fill out the relevant details for the record you are adding:
- HOST RECORD: If you are using a subdomain enter it in the hostname field, otherwise leave it blank
- POINTS TO: Enter the value we have given you. For example the Tracking Domain name, the SPF record value, etc.
- Click the Add button to save your changes.
CloudFlare

What details do I need?
Below is a list of the types of records you need to create or edit.
| Type | Name | Value |
| CNAME | mp1._domainkey | dkim.ourmailsender.com |
| TXT | @ | v=spf1 include:spf.ourmailsender.com ?all |
| CNAME | mptrack.yourdomain.com | api.transpond.io |
| CNAME | mpcdn.yourdomain.com | cdn1.ourmailsender.com |
| TXT | _dmarc | v=DMARC1; p=... |
- Make sure to replace
yourdomain.comwith your own domain. - All the DNS records for Transpond need to be set to DNS Only as opposed to Proxied.
How to add and update your DNS records in CloudFlare
- Login to your CloudFlare account.
- Go to DNS > Records.
- Select Add record to create a new one, or click Edit next to an existing record to update it.
If you have an existing SPF record then make sure to edit it, and include just the include:spf.ourmailsender.com part of it in the Value/Target.
- Choose a record type.
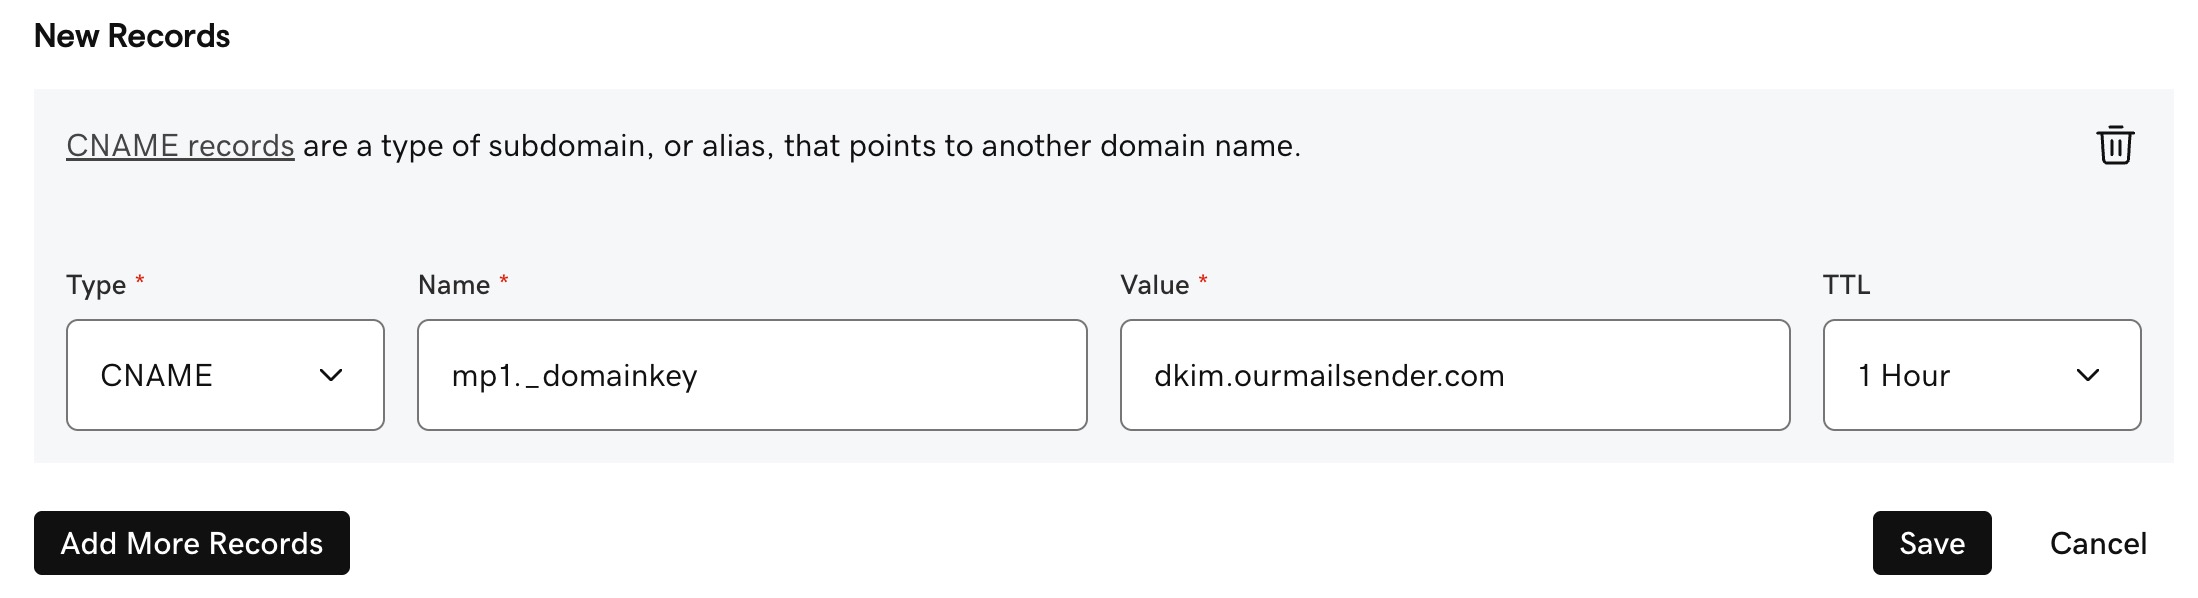
How to setup a DKIM record in CloudFlare
- Select CNAME Record record from the 'Type' drop down.
- In the 'Name' field, enter
mp1._domainkey - In the 'Target' field, enter
dkim.ourmailsender.com - Under 'Proxy Status', turn it off so it's set to DNS Only.
- Click Save and you're done.

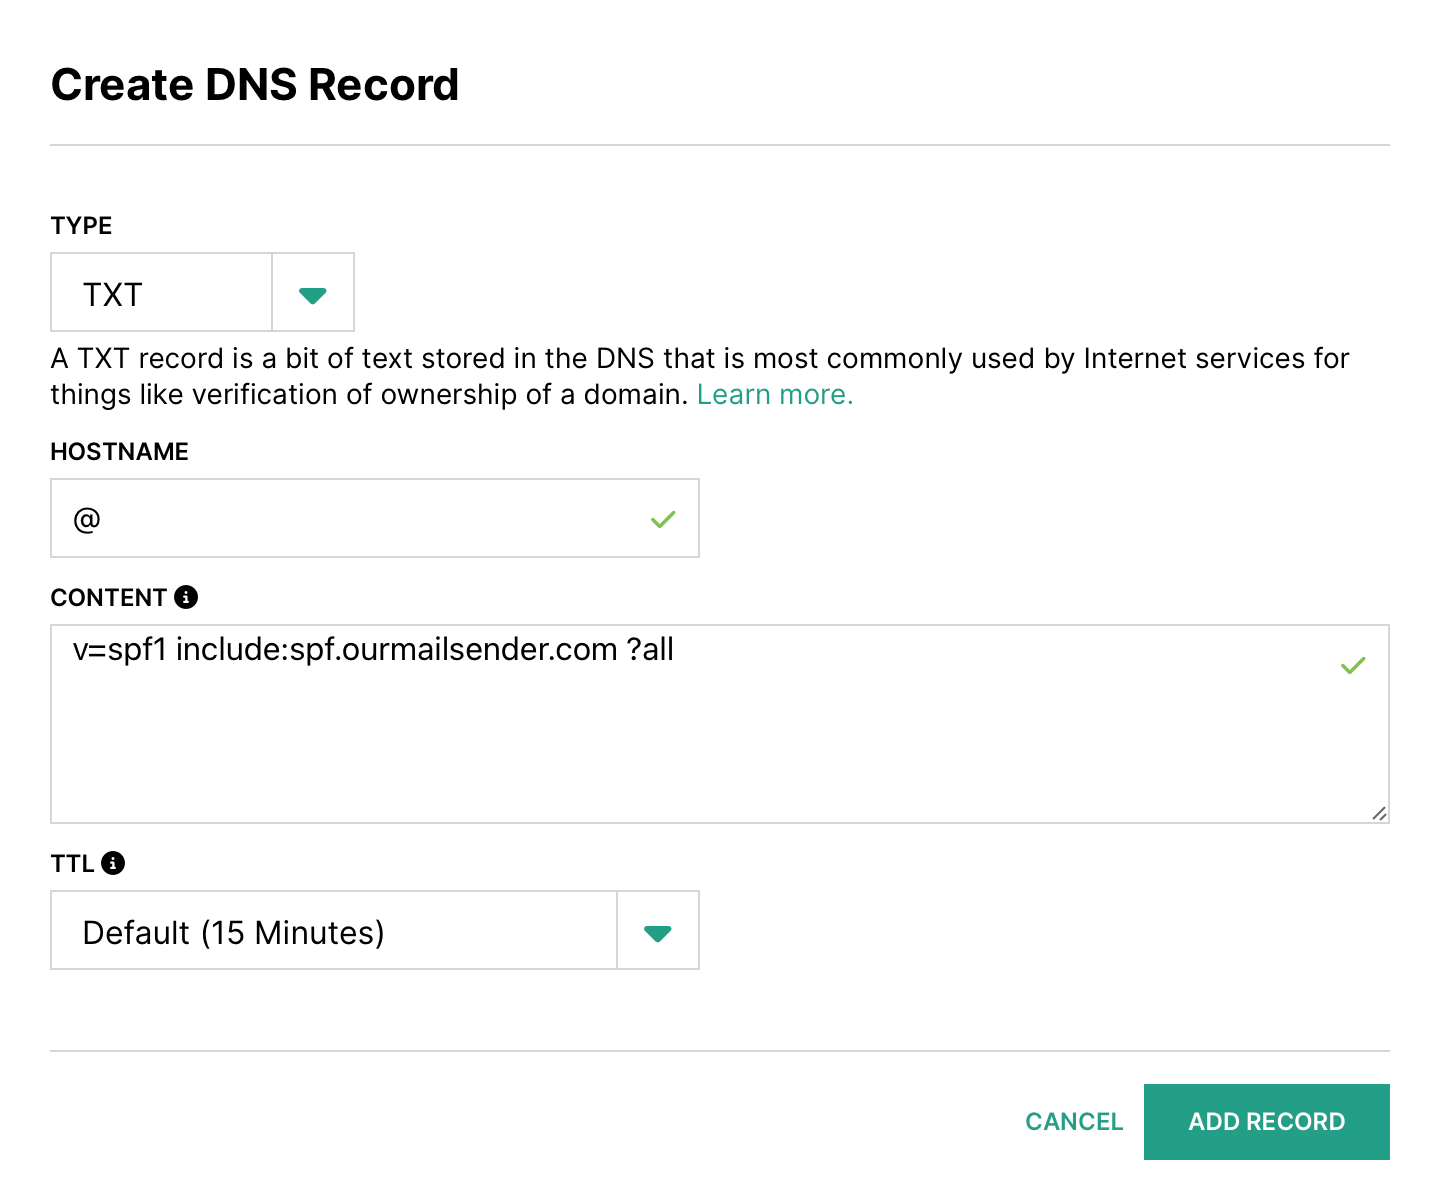
How to setup an SPF record in CloudFlare
- First look to see if you have an existing SPF record or not. It will be a TXT record that starts with
v=spf1. If you do, click to edit the Value for the existing one and move on to step 5. - If you don't have an existing one, click to Add new record
- Select TXT Record from the drop down
- In the 'Name' field, enter
@ - In the 'Target' field,
- if creating as new SPF record, enter
v=spf1 include:spf.ourmailsender.com ?all. - If editing an existing SPF record, just add
include:spf.ourmailsender.comat the end, before the part that says?all.
- if creating as new SPF record, enter
- Under 'Proxy Status', turn it off so it's set to DNS Only.
- Click Save.
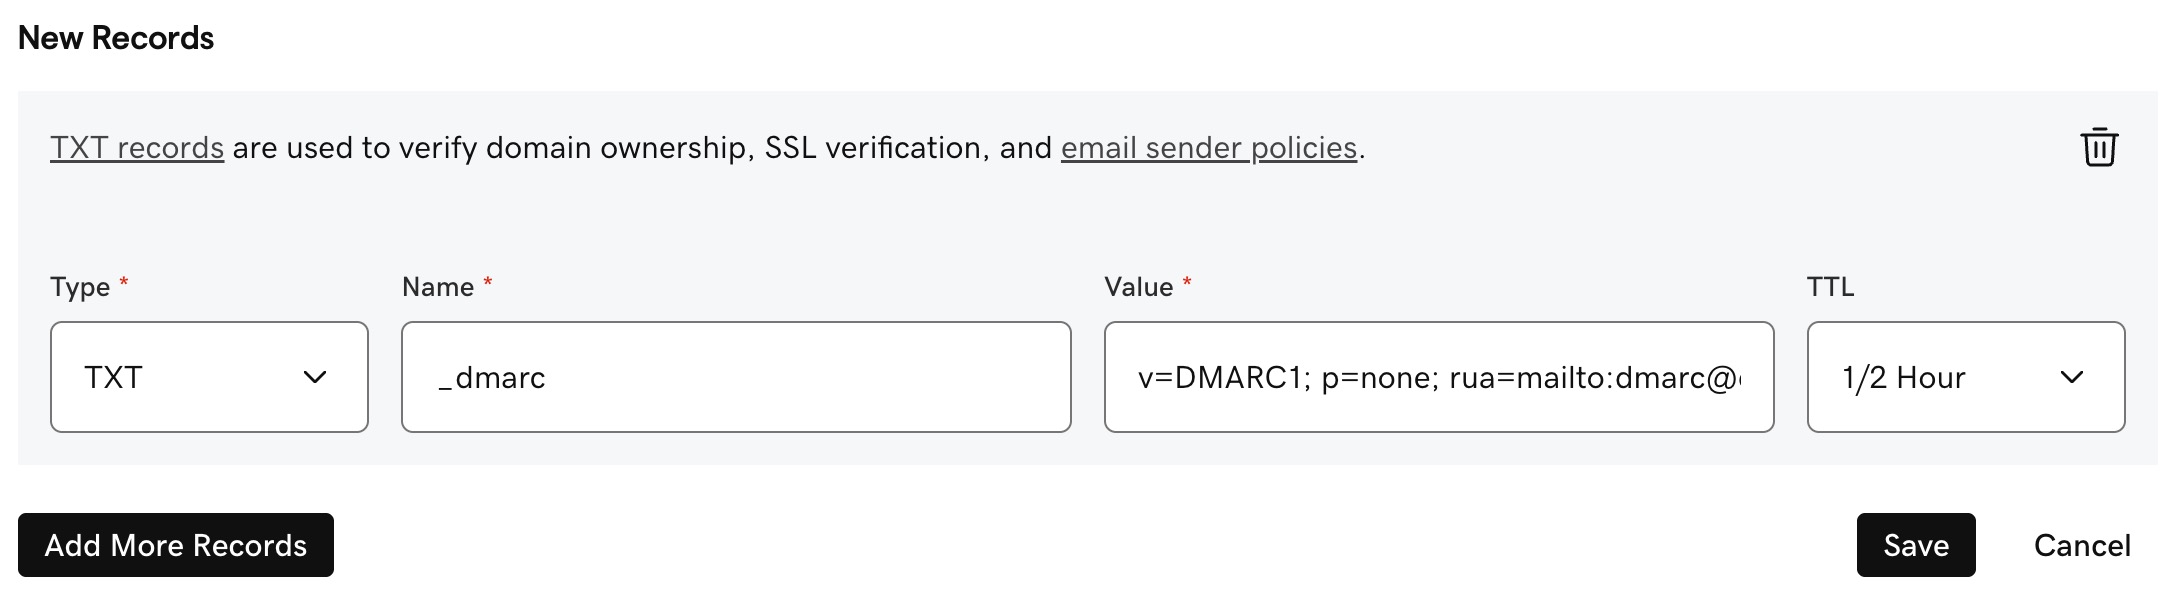
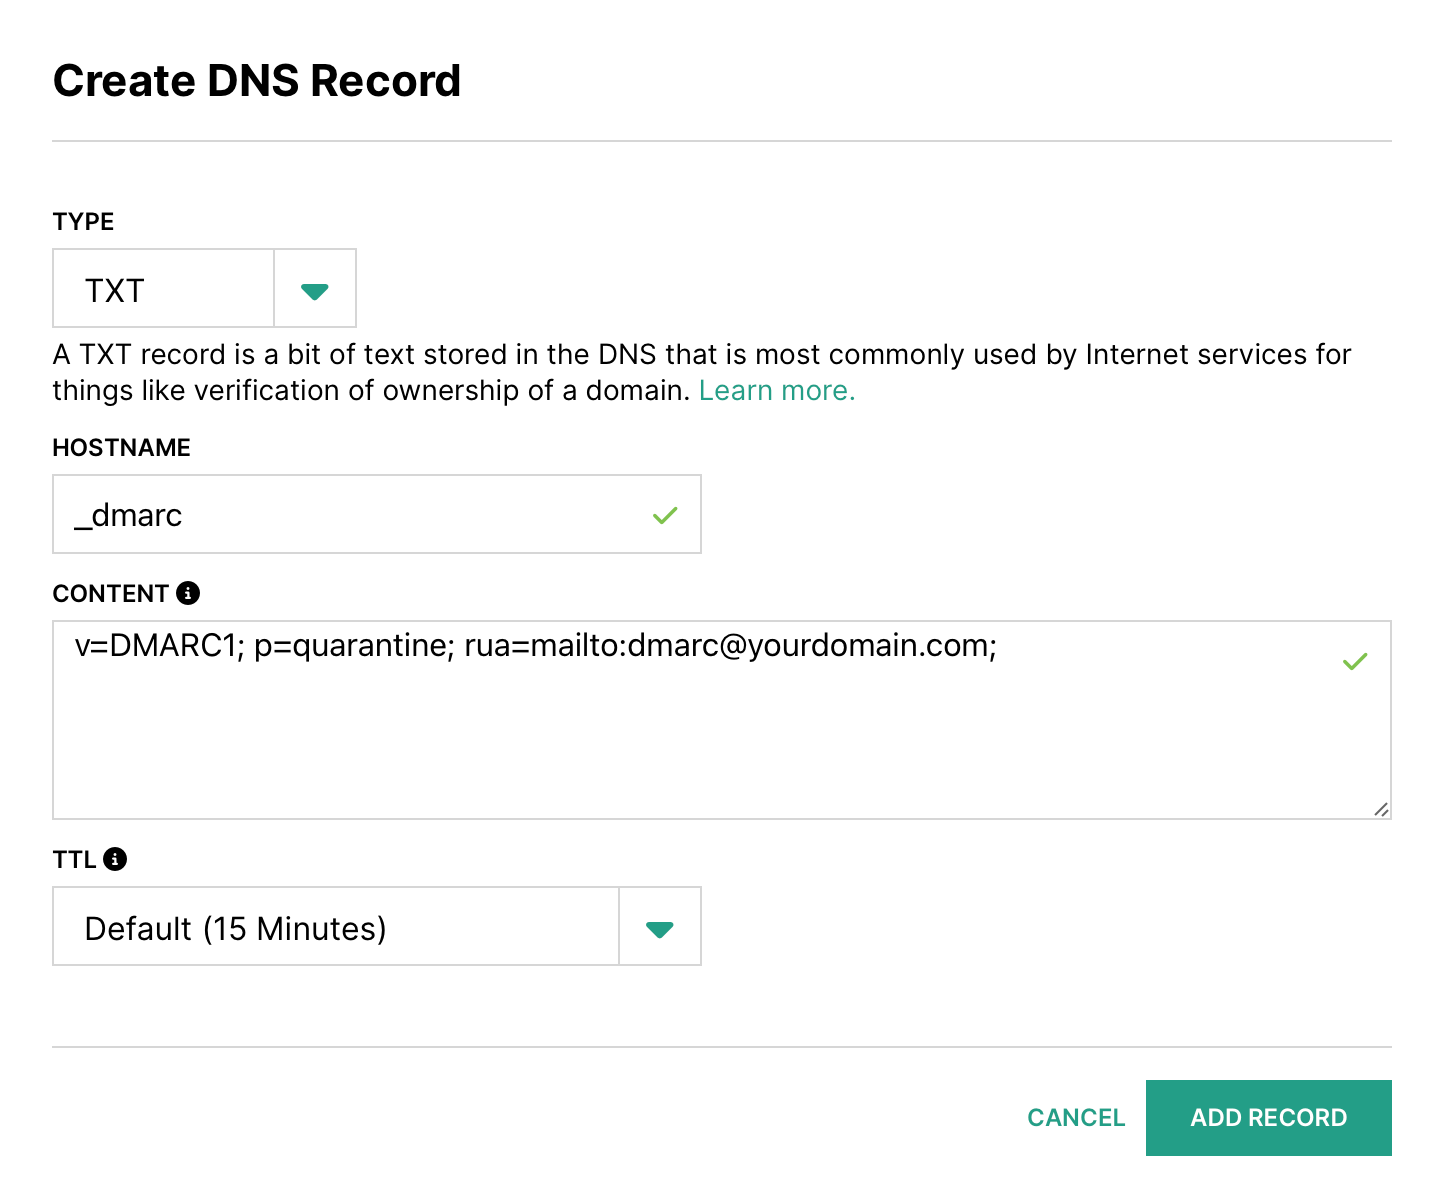
How to setup a DMARC record in CloudFlare
- Select TXT Record from the drop down.
- In the 'Name' field, enter
_dmarc - In the 'Value' field, add your DMARC record. It normally starts with
v=DMARC1; p=.... If you haven't yet generated a DMARC record then you can use one of the free tools online to set one up, such as DMARC Generator: https://dmarcgenerator.com - Under 'Proxy Status', turn it off so it's set to DNS Only.
- Click Save.
How to setup a Tracking Domain record in CloudFlare
- Select CNAME Record from the drop down.
- In the 'Name' field, enter
mptrack.yourdomain.com. Replace yourdomain.com with your own domain. - In the 'Value field, type
api.transpond.io - Under 'Proxy Status', turn it off so it's set to DNS Only.
- Click Save.
How to setup a CDN domain record in CloudFlare
- Select CNAME Record from the drop down.
- In the 'Name' field, enter
mpcdn.yourdomain.com. Replace yourdomain.com with your own domain. - In the 'Value' field, type
cdn1.ourmailsender.com - Under 'Proxy Status', turn it off so it's set to DNS Only.
- Click the green check mark to save the changes.

DreamHost

What details do I need?
Below is a list of the types of records you need to create or edit.
| Type | HOSTNAME | TARGETNAME / Content |
| CNAME | mp1._domainkey | dkim.ourmailsender.com |
| TXT | @ | v=spf1 include:spf.ourmailsender.com ?all |
| CNAME | mptrack.yourdomain.com | api.transpond.io |
| CNAME | mpcdn.yourdomain.com | cdn1.ourmailsender.com |
| TXT | _dmarc | v=DMARC1; p=... |
Make sure to replace yourdomain.com with your own domain.
How to add and update your DNS records in DreamHost
- Login to the DreamHost control panel
- Navigate to the Manage Websites page
- Click the DNS Settings link

- Choose Add Record

- At the top of the DNS Zone Editor section you will see a place to create new records.

-
Fill in the relevant details for the record you are adding.
- TYPE: Select the record type (CNAME, TXT, ANAME, etc)
- NAME: If you are using a subdomain enter it in the hostname field, otherwise leave it blank
- POINTS TO: Enter the value we have given you. For example the Tracking Domain name, the SPF record value, etc.
- Click the Add button to save the changes.
GoDaddy

What details do I need?
Below is a list of the types of records you need to create or edit.
| Type | HOSTNAME | TARGETNAME / Content |
| CNAME | mp1._domainkey | dkim.ourmailsender.com |
| TXT | @ | v=spf1 include:spf.ourmailsender.com ?all |
| CNAME | mptrack.yourdomain.com | api.transpond.io |
| CNAME | mpcdn.yourdomain.com | cdn1.ourmailsender.com |
| TXT | _dmarc | v=DMARC1; p=... |
Make sure to replace yourdomain.com with your own domain.
How to add and update your DNS records in GoDaddy
- Log in to your GoDaddy account
- Click Domain on the left-hand side of the screen
- Click DNS to see your existing DNS records
How to setup a DKIM record in GoDaddy
- Click Add New Record and select CNAME from the 'Type' dropdown menu
- In the 'Name' field, enter
mp1._domainkey - In the 'Value' field, enter
dkim.ourmailsender.com - Click Save
How to setup an SPF record in GoDaddy
- First, check if you have an existing SPF record. It will be a TXT record that starts with
v=spf1. If you do, click to edit the Value for the existing one and move on to step 4b. - If you do not have an existing SPF record, click Add New Record and select TXT from the 'Type' dropdown menu
- In the 'Name' field, enter
@ - In the 'Value' field:
- if creating as new SPF record, enter
v=spf1 include:spf.ourmailsender.com ?all - if editing an existing SPF record, just add
include:spf.ourmailsender.comat the end, before the part that says?all
- if creating as new SPF record, enter
- Click Save

How to setup a DMARC record in GoDaddy
- Click Add New Record and select TXT from the 'Type' dropdown menu
- Enter
_dmarcin the 'Name' field - Add your DMARC record in the 'Value' field. It normally starts with
v=DMARC1; p=...If you haven't yet generated a DMARC record, then you can use one of the free tools online to set one up, such as DMARC Generator: https://dmarcgenerator.com - Click Save
How to setup a Tracking Domain record in GoDaddy
- Click Add New Record and select CNAME from the 'Type' dropdown menu
- In the 'Name' field, enter
mptrack.yourdomain.com(replaceyourdomain.comwith your actual domain) - In the 'Value' field, enter
api.transpond.io - Click Save

How to setup a CDN Domain record in GoDaddy
- Click Add New Record and select CNAME from the 'Type' dropdown menu
- In the 'Name' field, enter
mpcdn.yourdomain.com(replaceyourdomain.comwith your actual domain) - In the 'Value' field, enter
cdn1.ourmailsender.com - Click Save

GreenGeeks

What details do I need?
Below is a list of the types of records you need to create or edit.
| Type | HOSTNAME | TARGETNAME / Content |
| CNAME | mp1._domainkey | dkim.ourmailsender.com |
| TXT | @ | v=spf1 include:spf.ourmailsender.com ?all |
| CNAME | mptrack.yourdomain.com | api.transpond.io |
| CNAME | mpcdn.yourdomain.com | cdn1.ourmailsender.com |
| TXT | _dmarc | v=DMARC1; p=... |
Make sure to replace yourdomain.com with your own domain.
How to add and update your DNS records in GreenGeeks
- Login to the GreenGeeks control panel
- Click the cPanel login button
- In the Domain section, click the Zone Editor button
- Choose Manage next to the Domain you would like to make changes to
-
Click the Add Record button at the top of the page.
- RECORD TYPE: Select the record type (CNAME, TXT, ANAME, etc)
- HOST: If you are using a subdomain enter it in the hostname field, otherwise leave it blank
- VALUE: Enter the value we have given you. For example the Tracking Domain name, the SPF record value, etc.
- Click the Add button to save your changes
Heart Internet

What details do I need?
Below is a list of the types of records you need to create or edit.
| Type | HOSTNAME | TARGETNAME / Content |
| CNAME | mp1._domainkey | dkim.ourmailsender.com |
| TXT | @ | v=spf1 include:spf.ourmailsender.com ?all |
| CNAME | mptrack.yourdomain.com | api.transpond.io |
| CNAME | mpcdn.yourdomain.com | cdn1.ourmailsender.com |
| TXT | _dmarc | v=DMARC1; p=... |
Make sure to replace yourdomain.com with your own domain.
How to view your DNS records in Heart Internet
- Login to your Heart Internet account
- Choose Manage Domain Names

- Select your domain name > Manage Now

- Choose DNS Management

How to add a new record in Heart Internet
- Scroll down to the Create New A/AAAA/CNAME section.

-
Fill in the relevant details of the record you want to add:
- SUB DOMAIN: If you are using a subdomain enter it in the hostname field, otherwise leave it blank
- ADDRESS: Enter the value we have given you. For example the Tracking Domain name, the SPF record value, etc.
- Click the Add button to save your changes
HostGator

What details do I need?
Below is a list of the types of records you need to create or edit.
| Type | HOSTNAME | TARGETNAME / Content |
| CNAME | mp1._domainkey | dkim.ourmailsender.com |
| TXT | @ | v=spf1 include:spf.ourmailsender.com ?all |
| CNAME | mptrack.yourdomain.com | api.transpond.io |
| CNAME | mpcdn.yourdomain.com | cdn1.ourmailsender.com |
| TXT | _dmarc | v=DMARC1; p=... |
Make sure to replace yourdomain.com with your own domain.
How to view your DNS records in HostGator
- Login to the Hostgator control panel
- Slect Domains from the left menu
- On the Domains page, choose the Domain you would like to manage
- At the top of the next page click DNS Management
How to add a new record in HostGator
- Click the Add DNS Record button located at the top of the DNS Management page.

-
Fill in the relevant details for the record you want to add:
- RECORD TYPE: Select the record type (CNAME, TXT, ANAME, etc)
- HOST: If you are using a subdomain enter it in the hostname field, otherwise leave it blank
- VALUE: Enter the value we have given you. For example the Tracking Domain name, the SPF record value, etc.
- Click the Add button to save your changes.
Hosting.com

What details do I need?
Below is a list of the types of records you need to create or edit.
| Type | HOSTNAME | TARGETNAME / Content |
| CNAME | mp1._domainkey | dkim.ourmailsender.com |
| TXT | @ | v=spf1 include:spf.ourmailsender.com ?all |
| CNAME | mptrack.yourdomain.com | api.transpond.io |
| CNAME | mpcdn.yourdomain.com | cdn1.ourmailsender.com |
| TXT | _dmarc | v=DMARC1; p=... |
Make sure to replace yourdomain.com with your own domain.
How to view your DNS records in Hosting.com
- Login to the Hosting.com Control Panel
- Click Websites & Domains in the left menu > DNS Settings
How to add a new record in Hosting.com
- Click the Add Record button
-
Fill in the relevant details for the record you want to add:
- RECORD TYPE: Select the record type (CNAME, TXT, ANAME, etc)
- HOST or DOMAIN NAME: If you are using a subdomain enter it in the hostname field, otherwise leave it blank
- VALUE: Enter the value we have given you. For example the Tracking Domain name, the SPF record value, etc.
- Click the Add button to save your changes.
Hostinger

What details do I need?
Below is a list of the types of records you need to create or edit.
| Type | HOSTNAME | TARGETNAME / Content |
| CNAME | mp1._domainkey | dkim.ourmailsender.com |
| TXT | @ | v=spf1 include:spf.ourmailsender.com ?all |
| CNAME | mptrack.yourdomain.com | api.transpond.io |
| CNAME | mpcdn.yourdomain.com | cdn1.ourmailsender.com |
| TXT | _dmarc | v=DMARC1; p=... |
Make sure to replace yourdomain.com with your own domain.
How to view your DNS records in Hostinger
- Log into your Hostinger account
- Click on Hosting > Manage

- Scroll down and choose the DNS Zone Editor tile

How to add a new record in Hostinger
- At the top of the DNS Zone Editor section, choose Add Record
-
Fill in the relevant details for the record you want to add:
- TYPE: Select the record type (CNAME, TXT, ANAME, etc)
- NAME: If you are using a subdomain enter it in the hostname field, otherwise leave it blank
- POINTS TO: Enter the value we have given you. For example the Tracking Domain name, the SPF record value, etc.
- Click the Add button to save your changes.
Hover

What details do I need?
Below is a list of the types of records you need to create or edit.
| Type | HOSTNAME | TARGETNAME / Content |
| CNAME | mp1._domainkey | dkim.ourmailsender.com |
| TXT | @ | v=spf1 include:spf.ourmailsender.com ?all |
| CNAME | mptrack.yourdomain.com | api.transpond.io |
| CNAME | mpcdn.yourdomain.com | cdn1.ourmailsender.com |
| TXT | _dmarc | v=DMARC1; p=... |
Make sure to replace yourdomain.com with your own domain.
How to view your DNS records in Hover
- Login to your Hover domain control panel.
- Click on DNS at the top of the page with your domain info
How to add a new record in Hover
Choose the ADD A RECORD button to create a new record.
If you have an existing SPF record then make sure to edit it, and include just the include:spf.ourmailsender.com part of it in the Value/Target.

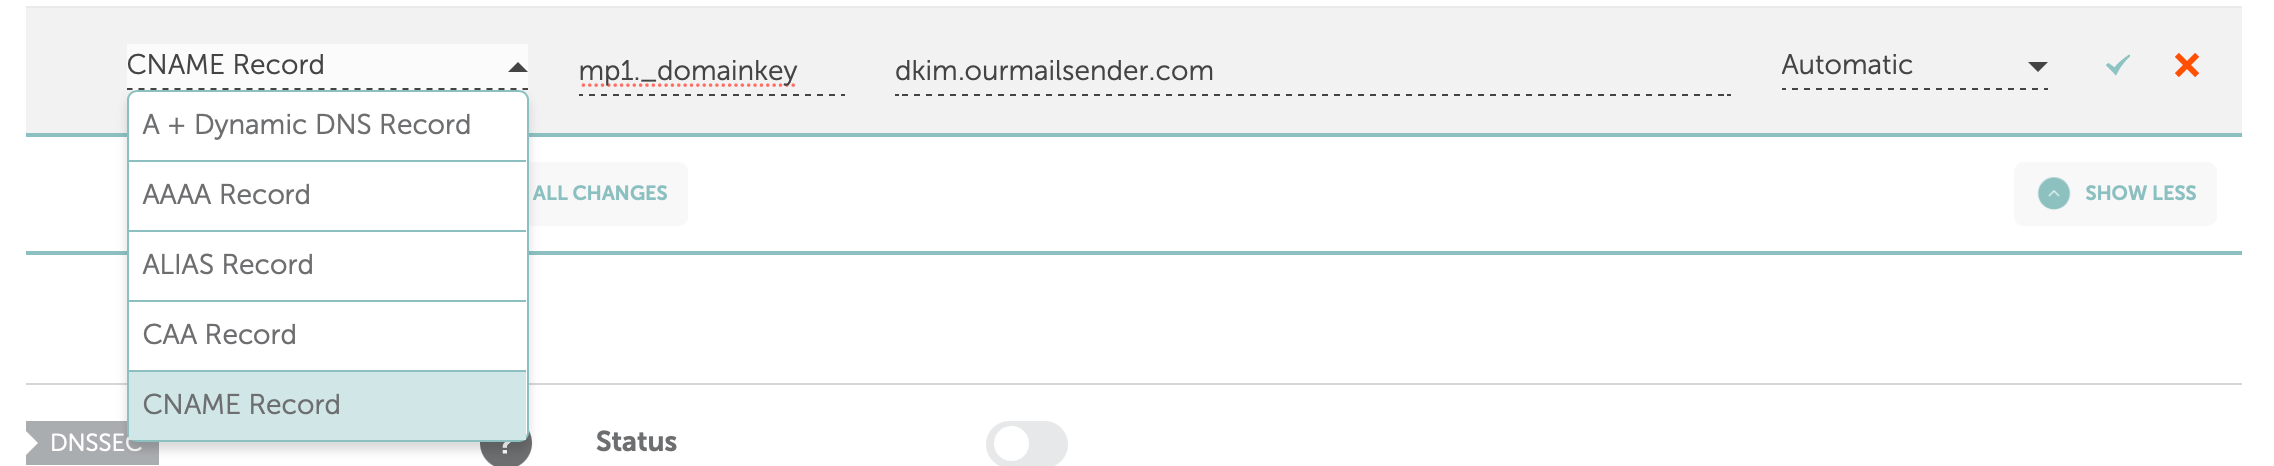
How to setup a DKIM record in Hover
- Select CNAME Record record from the 'Type' drop down.
- In the HOSTNAME field, enter
mp1._domainkey - In the TARGET NAME field, enter
dkim.ourmailsender.com - Click ADD RECORD to save your changes.

How to setup an SPF record in Hover
- First look to see if you have an existing SPF record or not. It will be a TXT record that starts with
v=spf1. If you do, click to edit the Value for the existing one and move on to step 5. - If you don't have an existing one, click to Add new record
- Select TXT Record from the 'Type' drop down
- In the HOSTNAME field, enter
@ - In the 'Content' field,
- if creating as new SPF record, enter
v=spf1 include:spf.ourmailsender.com ?all - If editing an existing SPF record, just add
include:spf.ourmailsender.comat the end, before the part that says?all
- if creating as new SPF record, enter
- Click ADD RECORD to save the changes.
How to setup a DMARC record in Hover
- Select TXT Record from the 'Type' drop down
- Enter
_dmarcin the HOSTNAME field - Add your DMARC record in the 'Content' field. It normally starts with
v=DMARC1; p=.... If you haven't yet generated a DMARC record then you can use one of the free tools online to set one up, such as DMARC Generator: https://dmarcgenerator.com - Click ADD RECORD to save the changes.
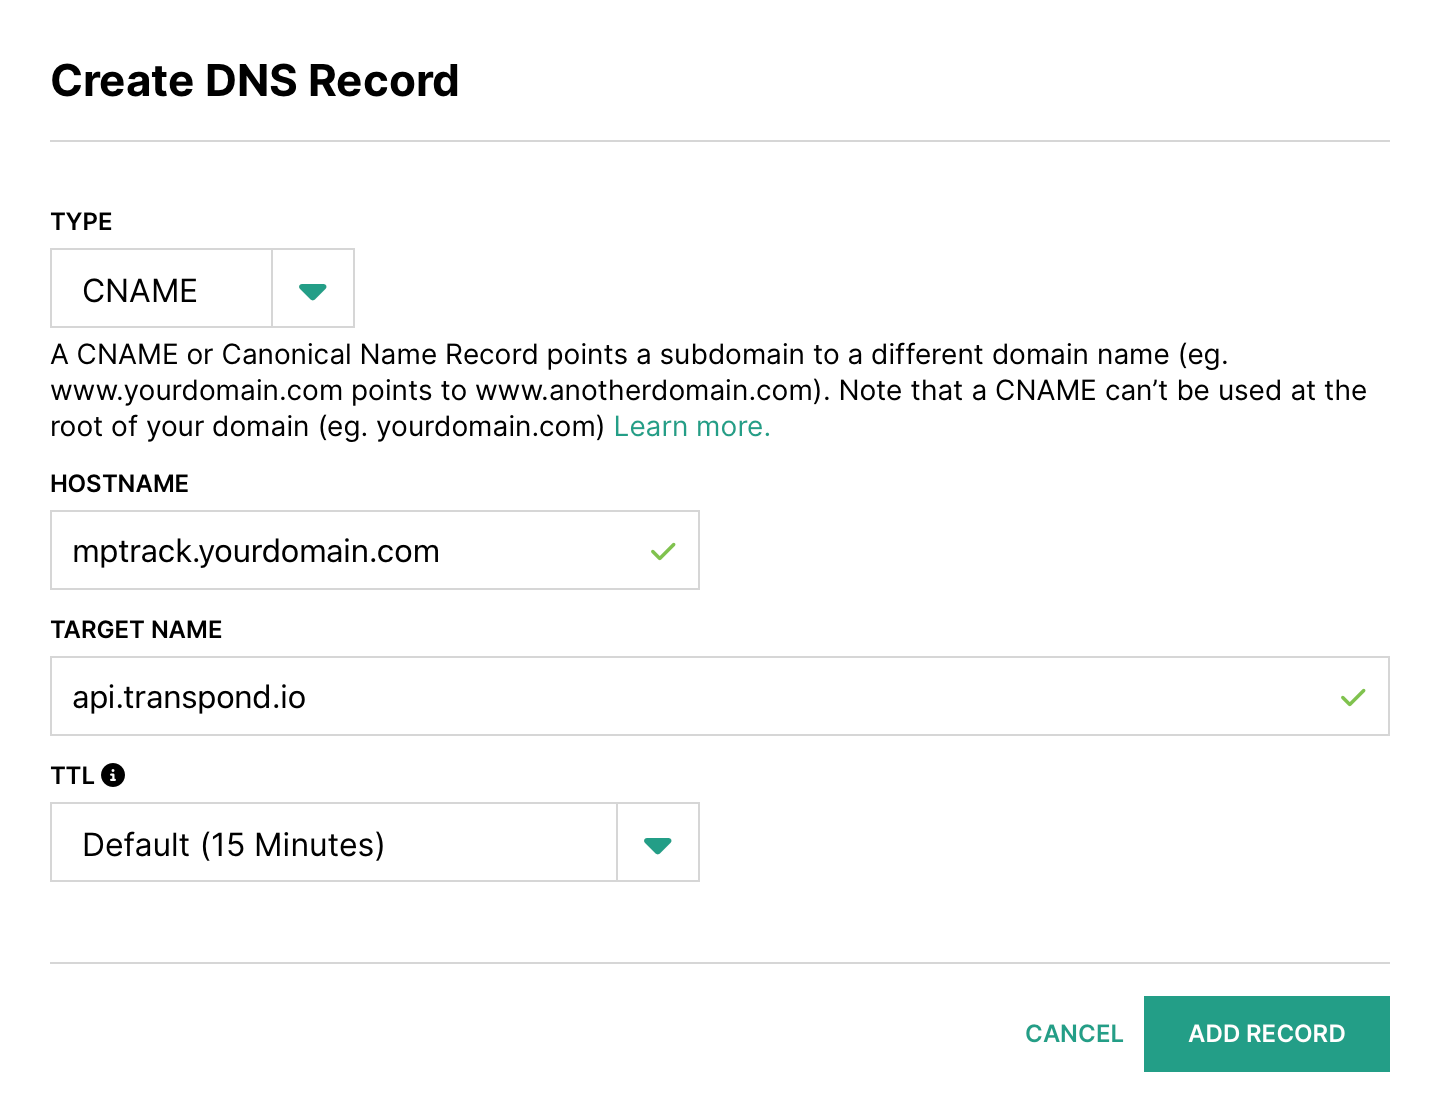
How to setup a Tracking domain record in Hover
- Select CNAME Record from the 'Type' drop down.
- Enter
mptrack.yourdomain.comin the HOSTNAME field. Replace yourdomain.com with your own domain. - Add
api.transpond.ioin the TARGET NAME field. - Click ADD RECORD to save the changes.
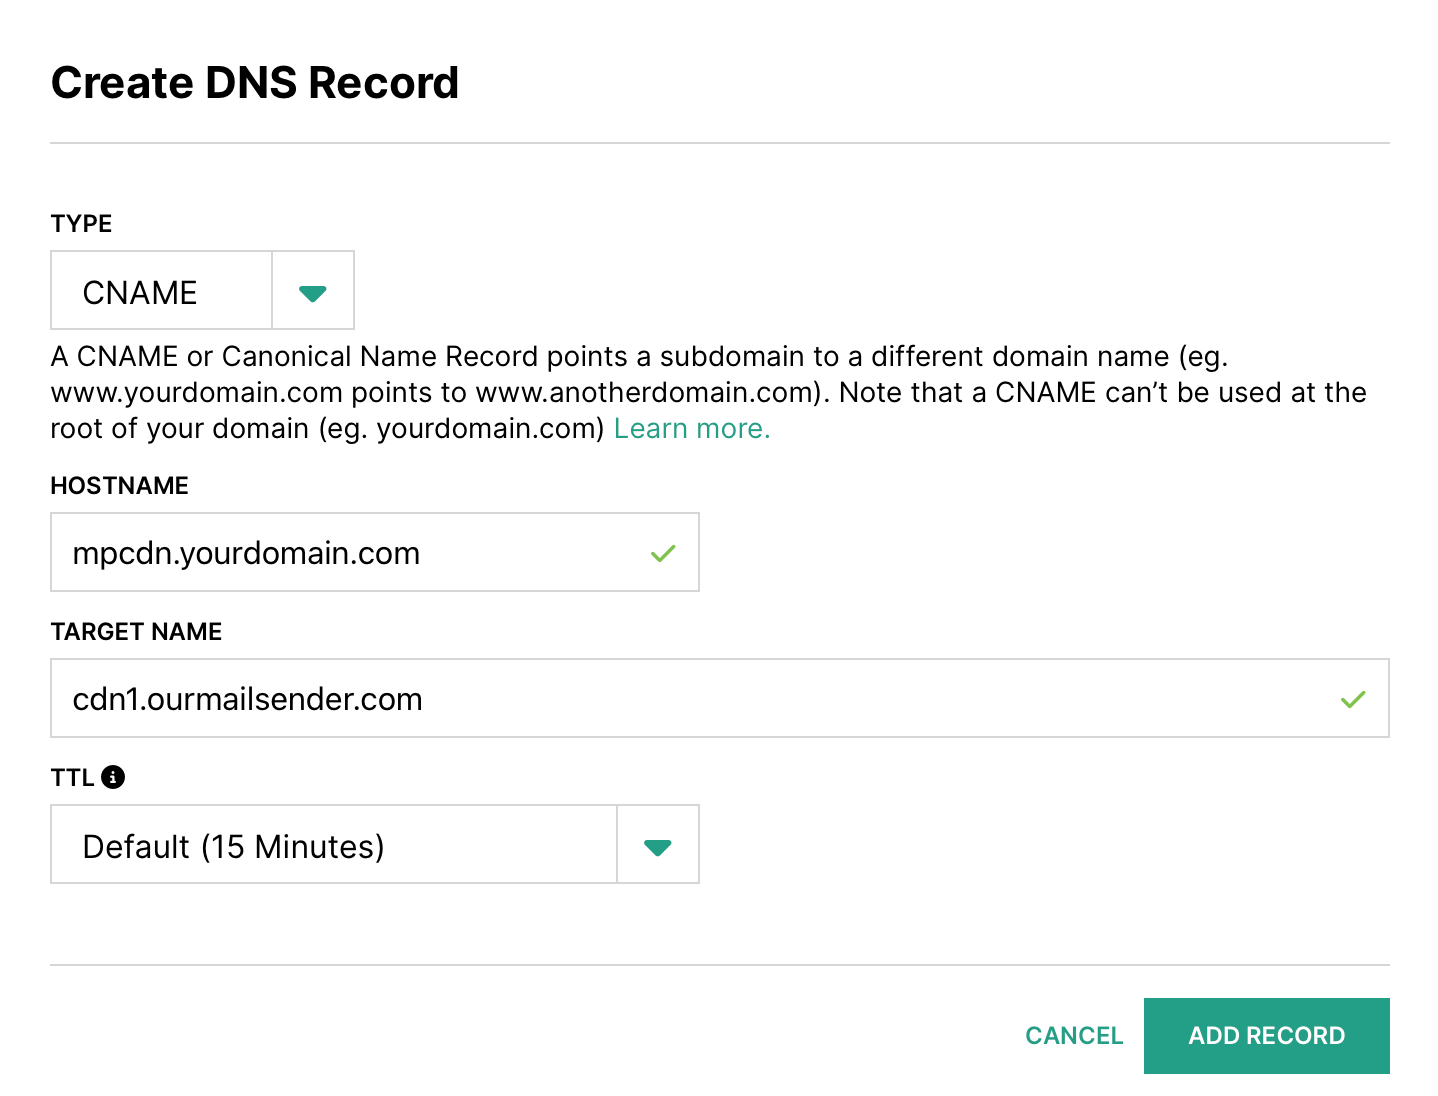
How to setup a CDN domain record in Hover
- Select CNAME Record from the 'Type' drop down.
- Enter
mpcdn.yourdomain.comin the HOSTNAME field. Replace yourdomain.com with your own domain. - Add
cdn1.ourmailsender.comin the TARGET NAME field - Click ADD RECORD to save the changes.
Ionos

What details do I need?
Below is a list of the types of records you need to create or edit.
| Type | HOSTNAME | TARGETNAME / Content |
| CNAME | mp1._domainkey | dkim.ourmailsender.com |
| TXT | @ | v=spf1 include:spf.ourmailsender.com ?all |
| CNAME | mptrack.yourdomain.com | api.transpond.io |
| CNAME | mpcdn.yourdomain.com | cdn1.ourmailsender.com |
| TXT | _dmarc | v=DMARC1; p=... |
Make sure to replace yourdomain.com with your own domain.
How to view your DNS records in Ionos
- Login to your Ionos account.
- Go to the Domain and SSL section.
- Click on the gear icon under Actions > DNS
How to add a new record in Ionos
Click the button to Add record. If you have an existing SPF record then make sure to edit it, and include just the include:spf.ourmailsender.com part of it in the Value/Target.
How to setup a DKIM record in Ionos
- Select CNAME Record record under 'Type'.
- In the 'Host' field, enter
mp1._domainkey - In the 'Target' field, enter
dkim.ourmailsender.com - Click Save.
How to setup an SPF record in Ionos
- First look to see if you have an existing SPF record or not. It will be a TXT record that starts with
v=spf1. If you do, click to edit the Value for the existing one and move on to step 5. - If you don't have an existing one, click to Add record
- Select TXT Record under 'Type'.
- In the 'Host' field, enter
@ - In the 'Value' field,
- if creating as new SPF record, enter
v=spf1 include:spf.ourmailsender.com ?all. - If editing an existing SPF record, just add
include:spf.ourmailsender.comat the end, before the part that says?all.
- if creating as new SPF record, enter
- Click Save.
How to setup a DMARC record in Ionos
- Select TXT Record under 'Type'.
- Enter
_dmarcin the Host field - Add your DMARC record in the 'Target' field. It normally starts with
v=DMARC1; p=.... If you haven't yet generated a DMARC record then you can use one of the free tools online to set one up, such as DMARC Generator: https://dmarcgenerator.com - Click Save.
How to setup a Tracking domain record in Ionos
- Select CNAME Record under 'Type'.
- Enter
mptrack.yourdomain.comin the Host field. Replace yourdomain.com with your own domain. - Add
api.transpond.ioin the Target field - Click Save.
How to setup a CDN domain record in Ionos
- Select CNAME Record under 'Type'.
- Enter
mpcdn.yourdomain.comin the Host field. Replace yourdomain.com with your own domain. - Add
cdn1.ourmailsender.comin the Target field - Click Save.
InMotion

What details do I need?
Below is a list of the types of records you need to create or edit.
| Type | HOSTNAME | TARGETNAME / Content |
| CNAME | mp1._domainkey | dkim.ourmailsender.com |
| TXT | @ | v=spf1 include:spf.ourmailsender.com ?all |
| CNAME | mptrack.yourdomain.com | api.transpond.io |
| CNAME | mpcdn.yourdomain.com | cdn1.ourmailsender.com |
| TXT | _dmarc | v=DMARC1; p=... |
Make sure to replace yourdomain.com with your own domain.
How to view your DNS records in InMotion
- Login to the InMotion Control Panel
- Select DNS > Add/Delete Records
How to add a new record in InMotion
- Select the domain you are working on from the drop down menu
- Choose the type of record from the tabs along the top (A, AAA, CNAME, TXT etc)

-
Fill in the relevant details for the record you want to add:
- NAME If you are using a subdomain enter it in the hostname field, otherwise leave it blank
- VALUE: Enter the value we have given you. For example the Tracking Domain name, the SPF record value, etc.
- Click the Add button to save your changes.
NameCheap

What details do I need?
Below is a list of the types of records you need to create or edit.
| Type | HOSTNAME | TARGETNAME / Content |
| CNAME | mp1._domainkey | dkim.ourmailsender.com |
| TXT | @ | v=spf1 include:spf.ourmailsender.com ?all |
| CNAME | mptrack.yourdomain.com | api.transpond.io |
| CNAME | mpcdn.yourdomain.com | cdn1.ourmailsender.com |
| TXT | _dmarc | v=DMARC1; p=... |
Make sure to replace yourdomain.com with your own domain.
How to view your DNS records in NameCheap
- Log in to your Namecheap account.
- Click on Domain List left the panel
- Use the button to Manage next to your domain
- Switch to the Advanced DNS tab.
How to add a new record in NameCheap
To create a new record, click the button to Add new record. If you have an existing SPF record then make sure to edit it, and include just the include:spf.ourmailsender.com part of it in the Value/Target.
How to setup a DKIM record in NameCheap
- Select CNAME Record record from the drop down.
- In the 'Host' field, enter
mp1._domainkey - In the 'Target' field, enter
dkim.ourmailsender.com - Click the green check mark to save the changes.
How to setup an SPF record in NameCheap
- First, check if you have an existing SPF record. It will be a TXT record that starts with
v=spf1. If you do, click to edit the Value for the existing one and move on to step 5. - If you don't have an existing one, click to Add new record
- Select TXT Record from the drop down
- In the 'Host' field, enter
@ - In the 'Value' field,
- if creating as new SPF record, enter
v=spf1 include:spf.ourmailsender.com ?all - If editing an existing SPF record, just add
include:spf.ourmailsender.comat the end, before the part that says?all
- if creating as new SPF record, enter
- Click the green check mark to save the changes.

How to set up a DMARC record in NameCheap
- Select TXT Record from the drop down
- Enter
_dmarcin the Host field - Add your DMARC record in the 'Target' field. It normally starts with
v=DMARC1; p=.... If you haven't yet generated a DMARC record then you can use one of the free tools online to set one up, such as DMARC Generator: https://dmarcgenerator.com - Click the green check mark to save the changes.

How to setup a Tracking domain record in NameCheap
- Select CNAME Record from the drop-down
- Enter
mptrack.yourdomain.comin the Host field. Replace yourdomain.com with your own domain. - Add
api.transpond.ioin the Target field - Click the green check mark to save the changes.

How to setup a CDN domain record in NameCheap
- Select CNAME Record from the drop down
- Enter
mpcdn.yourdomain.comin the Host field. Replace yourdomain.com with your own domain. - Add
cdn1.ourmailsender.comin the Target field - Click the green check mark to save the changes.
SiteGround

What details do I need?
Below is a list of the types of records you need to create or edit.
| Type | HOSTNAME | TARGETNAME / Content |
| CNAME | mp1._domainkey | dkim.ourmailsender.com |
| TXT | @ | v=spf1 include:spf.ourmailsender.com ?all |
| CNAME | mptrack.yourdomain.com | api.transpond.io |
| CNAME | mpcdn.yourdomain.com | cdn1.ourmailsender.com |
| TXT | _dmarc | v=DMARC1; p=... |
Make sure to replace yourdomain.com with your own domain.
How to view your DNS records in SiteGround
- Login to the SiteGround control panel
- Go to Site Tools > Domain
- Choose DNS Editor

How to add a new record in SiteGround
- Go to the Create a new record area
- Click the tab that relates to the type of record you are creating. Options are A, AAAA, CNAME. MX, SRV, TXT

-
Fill in the relevant details for the record you want to add:
- NAME: If you are using a subdomain enter it in the hostname field, otherwise leave it blank
- RESOLVES TO: Enter the value we have given you. For example the Tracking Domain name, the SPF record value, etc.
- Click the Add button to save your changes