Sending A/B Split Testing Campaigns
Why Use A/B Split Testing?
A/B split testing helps you improve your email performance by comparing different versions of the same campaign to see which one resonates more with your audience.
Instead of relying on guesswork, you can make decisions based on real subscriber behaviour. This helps you improve important metrics like opens, clicks, and engagement over time.
With A/B testing, you can experiment with things like:
- Subject lines
- Sender names
- Email content
- Calls to action
- Layouts or messaging
For example, you might test two different subject lines to learn which one generates more opens, or compare two email designs to see which gets more clicks.
Transpond automatically sends your test variations to a sample of your audience, tracks the results, and then sends the winning version to the remaining subscribers. This helps reduce the risk of sending a lower-performing campaign to your full list while giving you valuable insight into what your audience responds to best.
For the clearest results, it’s usually best to test one major change at a time. This makes it easier to understand exactly what influenced the outcome.
Who can use this feature? All Users
Available on: Growth, Advanced and Ultimate
How to Send an A/B Split Test Campaign
- Click the + Create button in the top menu bar and choose Campaign.
- Give your campaign a name, and choose the Email A/B Split Test.
- Now you’ll need to select the full list of recipients who will be receiving the Campaign. Once you’ve chosen your Groups or Segments to be sent to, click Next Step.
- Next you’ll need to create your first test campaign by clicking Add Test. You’ll need to enter the following information:
- Email Subject
- From Name
- From Address
- Reply Address
- Next click Edit Email Content. You will then create your Campaign just as you would in a normal Campaign. Once you’ve selected the template and added your content for the first Test Campaign, click Save and Continue so you can setup the next test.
-
Now you can create more Test Campaigns by either starting a new Campaign from scratch by clicking Add Test, then repeating the precious steps, or you can copy and duplicate the first Test you’ve saved by selecting the three dots by the saved Test, then selecting Copy from the options given.
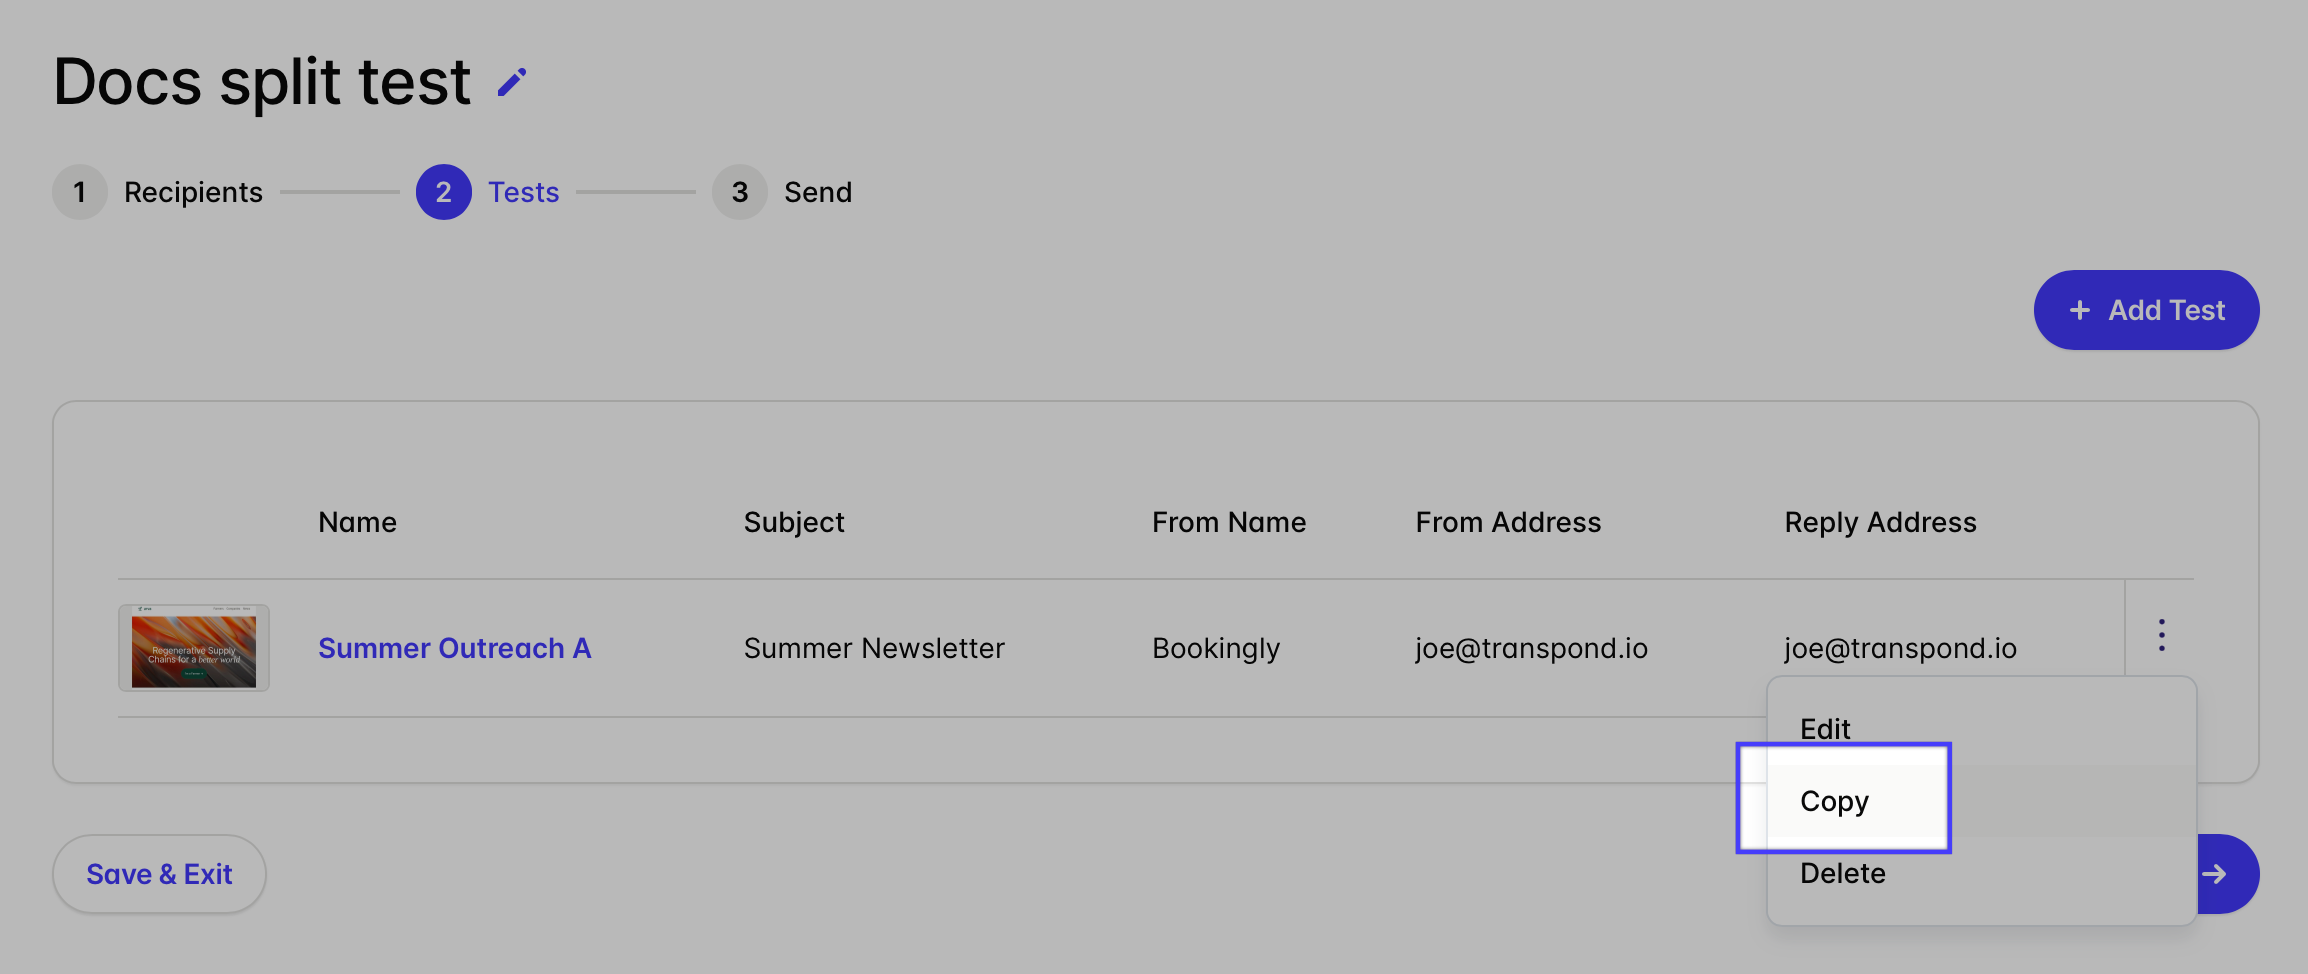
If you copy and duplicate the Test you’ve created, you can then click on the campaign name to edit the specific details and content for it.
- Once you have all the desired variants of your Test Campaign to send out to your subscribers, click Next Step.
-
Transpond will default to sending your Test Campaigns to 50% of the subscribers you’ve added to receive the Campaign, then will test to determine which performs better, and then automatically send the winning Test Campaign to the remaining 50% of subscribers.
Drag he slider to adjust these number of subscribers to receive each Test Campaign, and how many subscribers you’d like to receive the winning campaign.
-
Under Wait you configure how long you’d like to wait until your winning Test Campaign is decided and sent to the remaining Subscribers.
Giving subscribers enough time to open and interact with the email can help produce more reliable results.
-
Under Send the final campaign you choose how your winning Campaign should be determined.
For example, you can select:
- Total Opens
- Unique Opens
- Total Clicks
-
Unique Clicks
Choose the metric that best matches your campaign goal. If you are testing subject lines, opens may be the best indicator. If you are testing content or calls to action, clicks may provide more meaningful insight.
- Finally, select a Start Date and a Start Time for your campaign to be sent. Once selected and you’re happy with your Test Campaigns and details, click Send Campaign and you’re all set.

Note that you can't use Smart Sending with Split Campaigns. They're only available for standard Email Campaigns.
Monitoring the Results of Your A/B Split Test Campaign
A/B testing is most valuable when you review the results and apply what you learn to future campaigns. Monitoring performance helps you identify patterns in subscriber behaviour so you can continue improving your email marketing over time.
To view your split test results:
- Go to Campaigns > A/B Split.
- Click on your A/B Split Test campaign.
You can easily identify split test campaigns because they use a different icon from standard campaigns.
When viewing an A/B Split Test, the main statistics shown relate to the overall campaign, including all tests and the final winning send. This includes metrics such as:
- Opens
- Clicks
- Unsubscribes
- Other overall engagement statistics
You will also see a dedicated Tests tab, which is only available for A/B Split campaigns.
From the Tests tab, you can:
- View all test variations
- Identify the winning version
- Compare how each test performed
Clicking into an individual test gives you a more detailed breakdown of that specific variation’s performance. This can help you better understand what changes had the biggest impact and apply those learnings to future campaigns.